Content Overview:
- Accessing and Viewing Emails
- Filtering Emails
- Understanding Email Status
- Replying to Emails
- Copy thread token feature
- Resend original thread feature
- Downloading Emails
- Using User Email Tokens
Accessing and Viewing Emails:
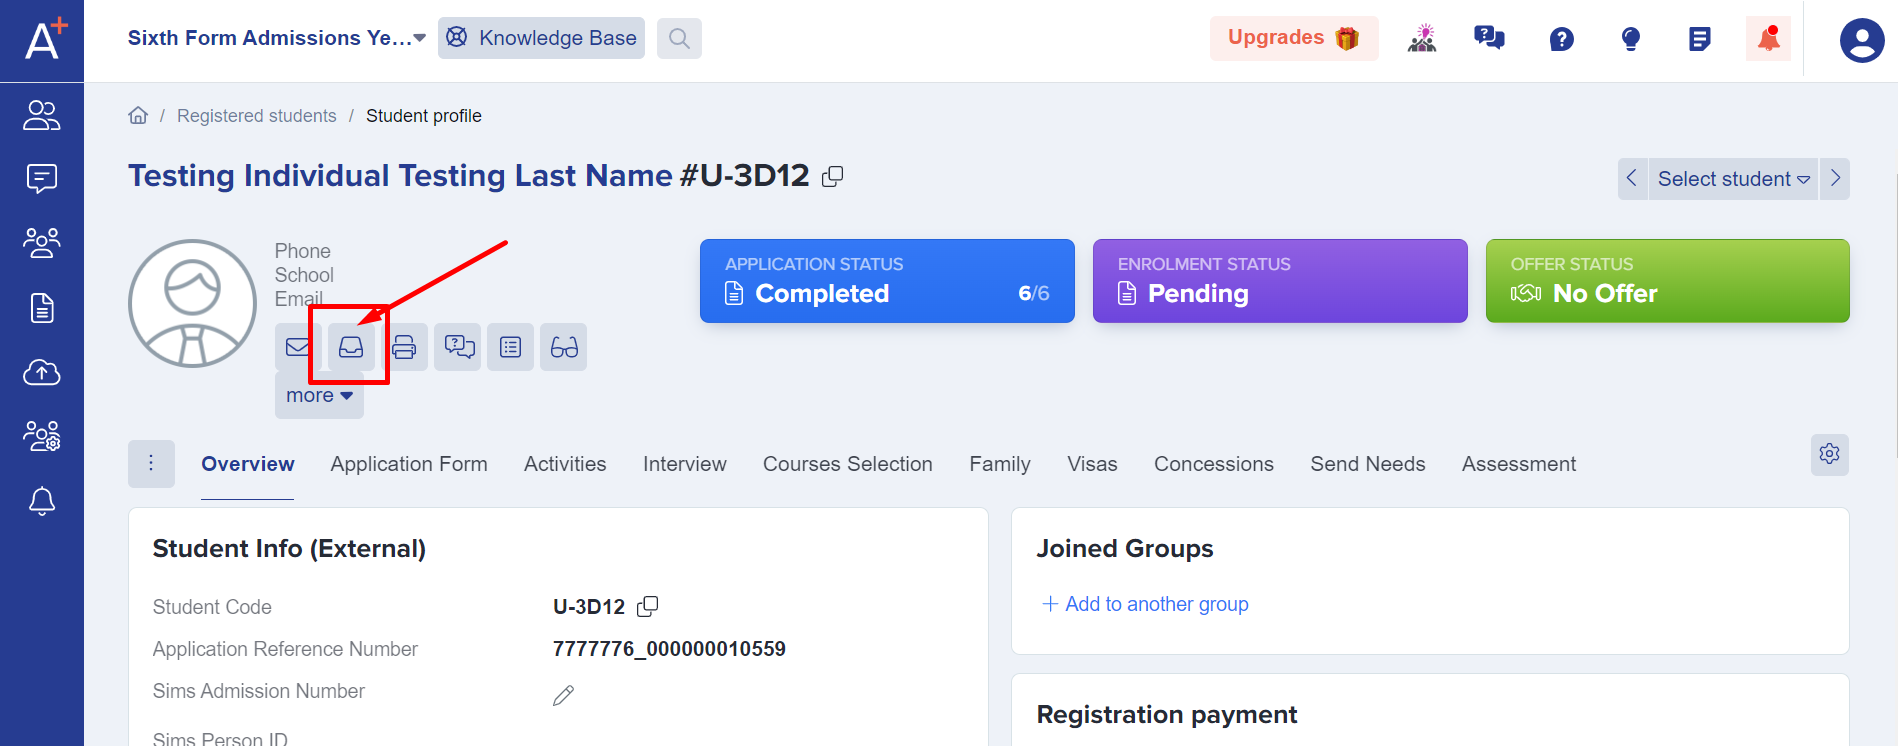
To access and view emails and notifications, simply navigate to any student / parent profile. By clicking on the inbox icon shown, you can view their content and status. You can also reply to and resend emails. This feature is known as the Communication Log.
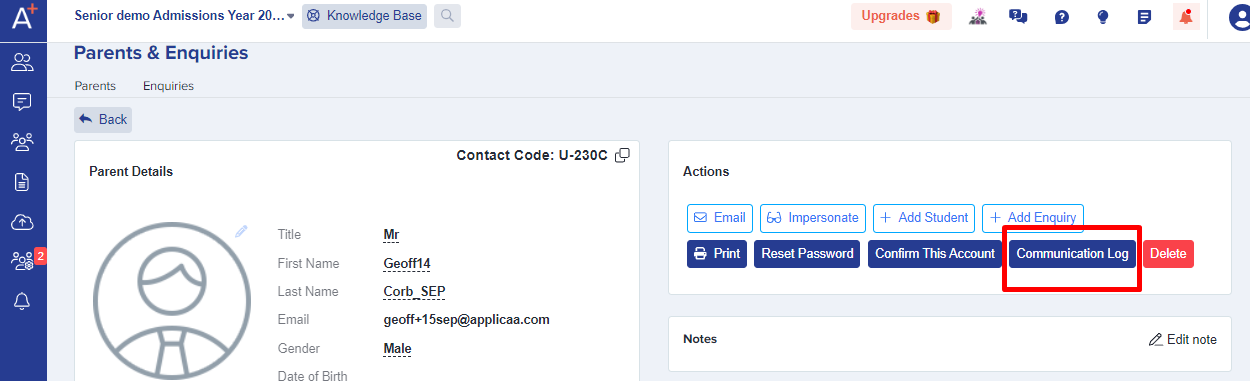
Via parents profile, you may also access the communication log button in the Actions area as shown below.
To view the content of the emails, you have two options. You can access the emails by clicking a thread on the left- hand side, or you can search for a specific key word in the subject line by typing in the search bar located at the top of the list.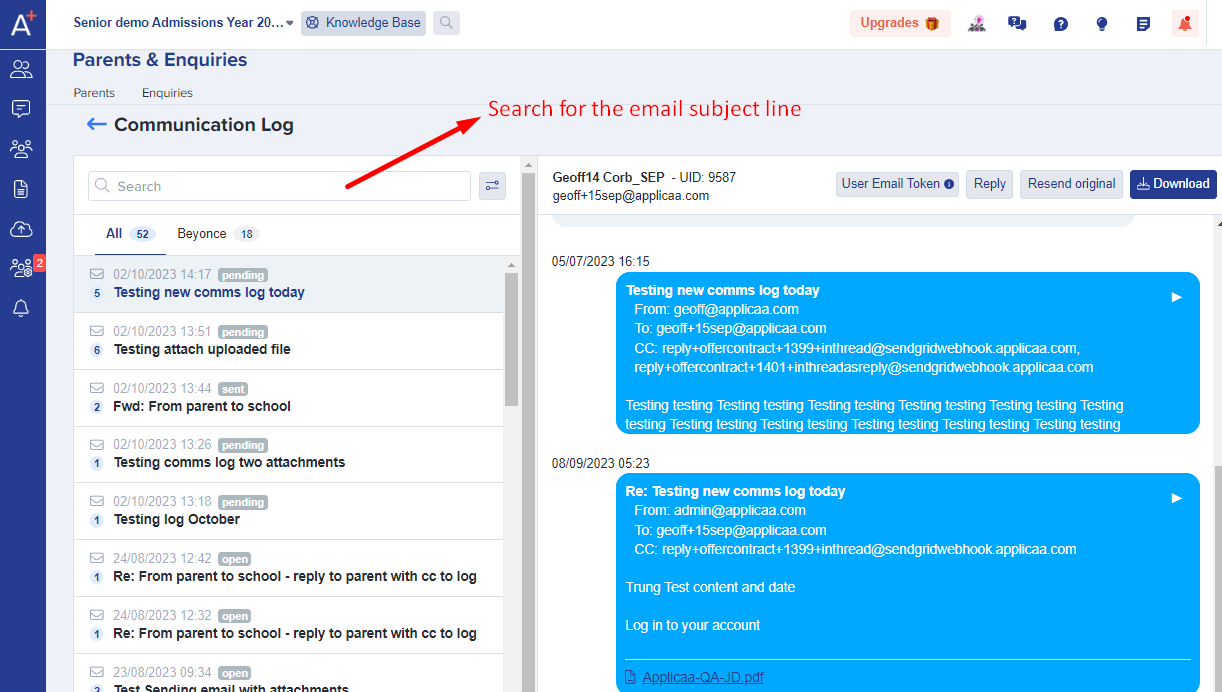
You can easily identify the timestamp of when you sent an email, as well as view the age of the messages and the status of each email.

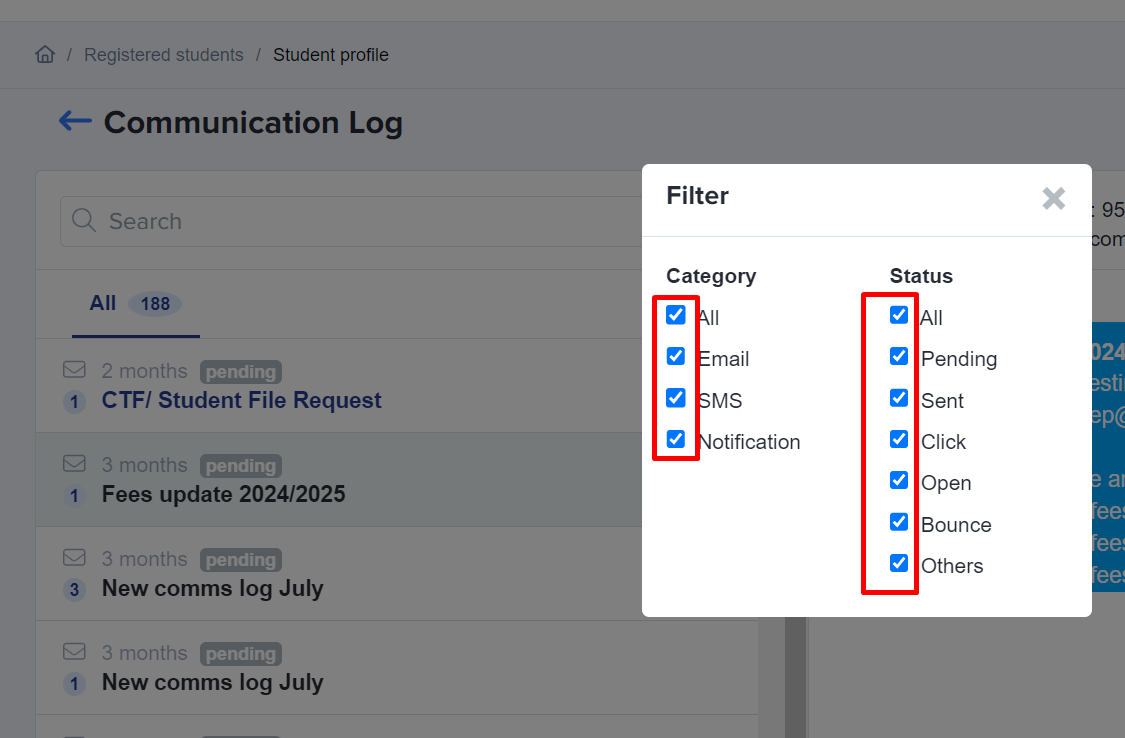
Filtering Emails:
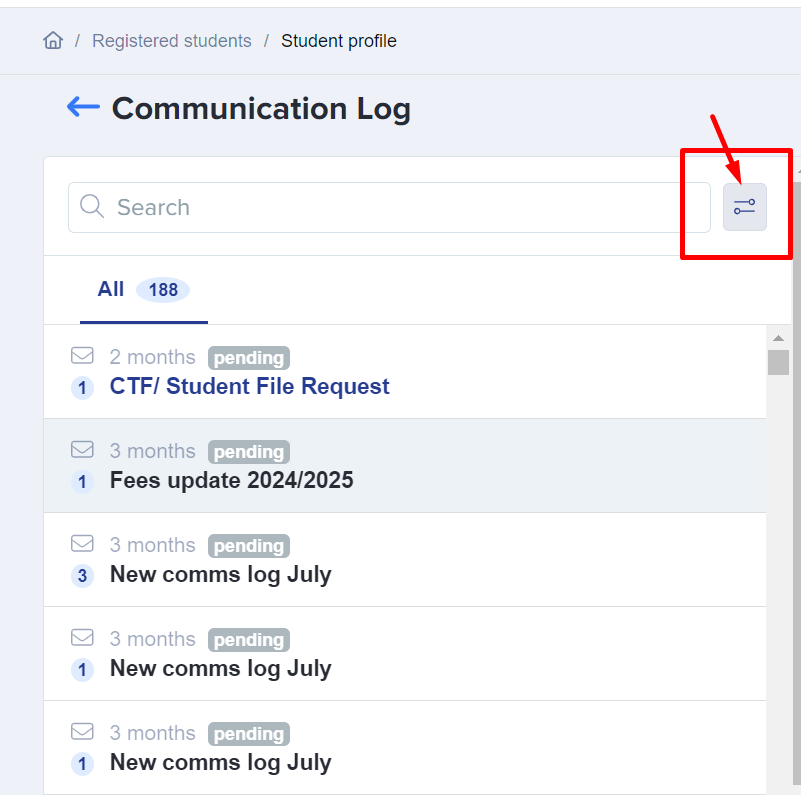
You can also filter the emails by category or status. To do this, click on the control panel next to the search field. From there, you can select or deselect the filters you want to apply.
Understanding Email Status:
Each email status provides valuable information about the delivery and interaction of your emails.
- Dropped – This status indicates that the email was dropped by 'Sendgrid' due to various reasons such as the recipient being in a suppression group, previous bounces, or spam marking.
- Delivered – When an email is marked as delivered, it means that the recipient's mail server successfully delivered the email.
- Bounce – If a server is unable or unwilling to deliver a message, it is considered a bounce event. Common reasons for bounces include outdated or incorrect email addresses and firewalls or security measures. By identifying bounced emails, you can remove them from your lists to avoid future bounces.
- Open – The "Open" status indicates that the recipient has opened the email.
- Click – When a recipient clicks on any tracked links in your email, Sendgrid records the date, time, and specific URL that was clicked.
- Blocked – If your IP address is blocked by an ISP or messaging organization, it means that your emails are being prevented from reaching their intended recipients. While blocks are not as severe as bounces, they do not result in permanent suppressions. This means that subsequent emails sent to blocked addresses will not be automatically suppressed.
- Pending - the message has been sent from the platform to our email processor (Sendgrid) but it has not been sent on from there yet.
- Sent - the message has been sent to the recipients email provider and but it is not reported as being opened
- Other - there are a number of rare statuses that would be reported as Other in the thread summary. When you view individual emails you will see the actual status.
Understanding these email status indicators allows you to track the effectiveness of your communication and take necessary actions to ensure successful delivery and engagement with your recipients.
Replying to Emails:
Additionally, you have the ability to reply to an email and view the entire email thread directly in the communication logs area. To do this, simply click on any message and then click on the reply field located below the email thread.

Once clicked, it will give the viewing as below:

From address may be coming from 'admin@applicaa.com' if you haven't activated your DNS records. Here's the guide on how to change your default email settings.
To address - that would be the email address of the student or parent but you may also add another email address if needed by typing it on the field and hit enter from your keyboard.

Then after that, you may now put your message reply in the content box and if an attachment is required you may do so, by clicking the 'Add attachment' button. Once you're happy with it, press 'send'.

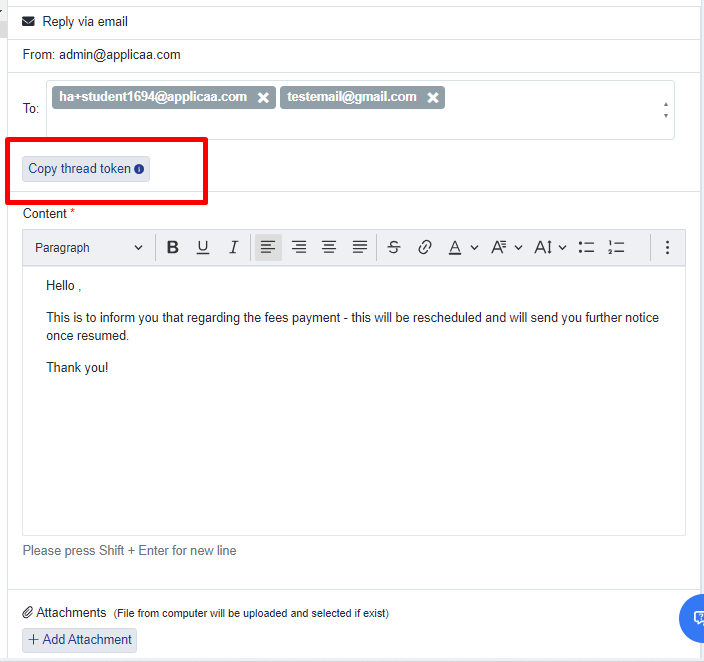
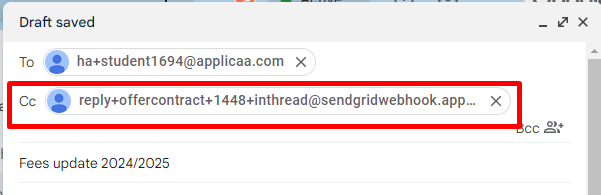
Copy thread token feature:
Schools also have the option to reply to parents or students through their usual email client, such as Google Mail or Outlook. This is useful in case the applicants have sent separate emails and you want to include those conversations in the email thread within the communication logs.
To do this, simply click on the 'copy thread token' as shown below. Then, compose a message in your Google Mail or preferred email client, and paste the token into the CC or To field.
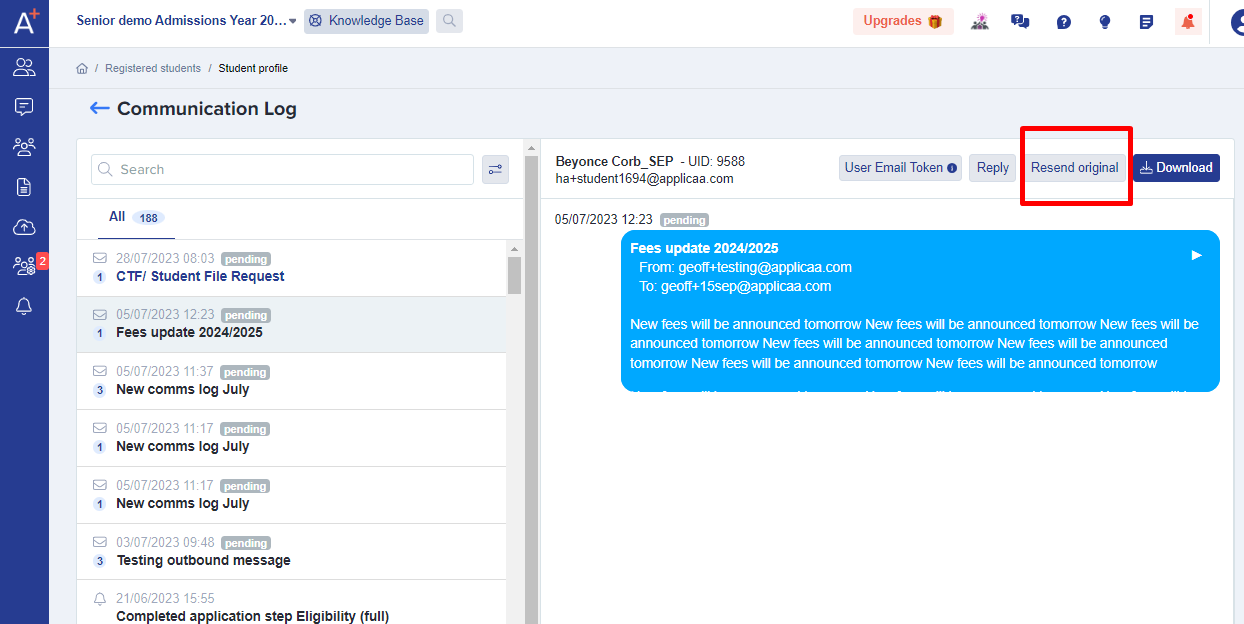
Resend original email in the thread feature:
Another useful feature is the ability to resend the first email in the thread. This can be helpful if parents mention that they haven't received any new messages or emailed offer letters. Whether the thread is lengthy or not, you can simply click the 'Resend original' button on the right side when viewing any message to resend the first email in the thread.
Downloading Emails:
You also have the option to download all the emails sent to the student/parent. To do this, simply click on the 'Download' button and select a start date and end date for the export. This allows you to easily save and access a record of all the emails exchanged during a specific time period.

Note regarding the attachments being sent, you are now able to see the files/documents that you've sent to an applicant.
Previewing Emails:
You may also use the 'View' button in the Communications Log, enabling users to see the original email in its initial format.
-png.png?width=688&height=673&name=image%20(38)-png.png)
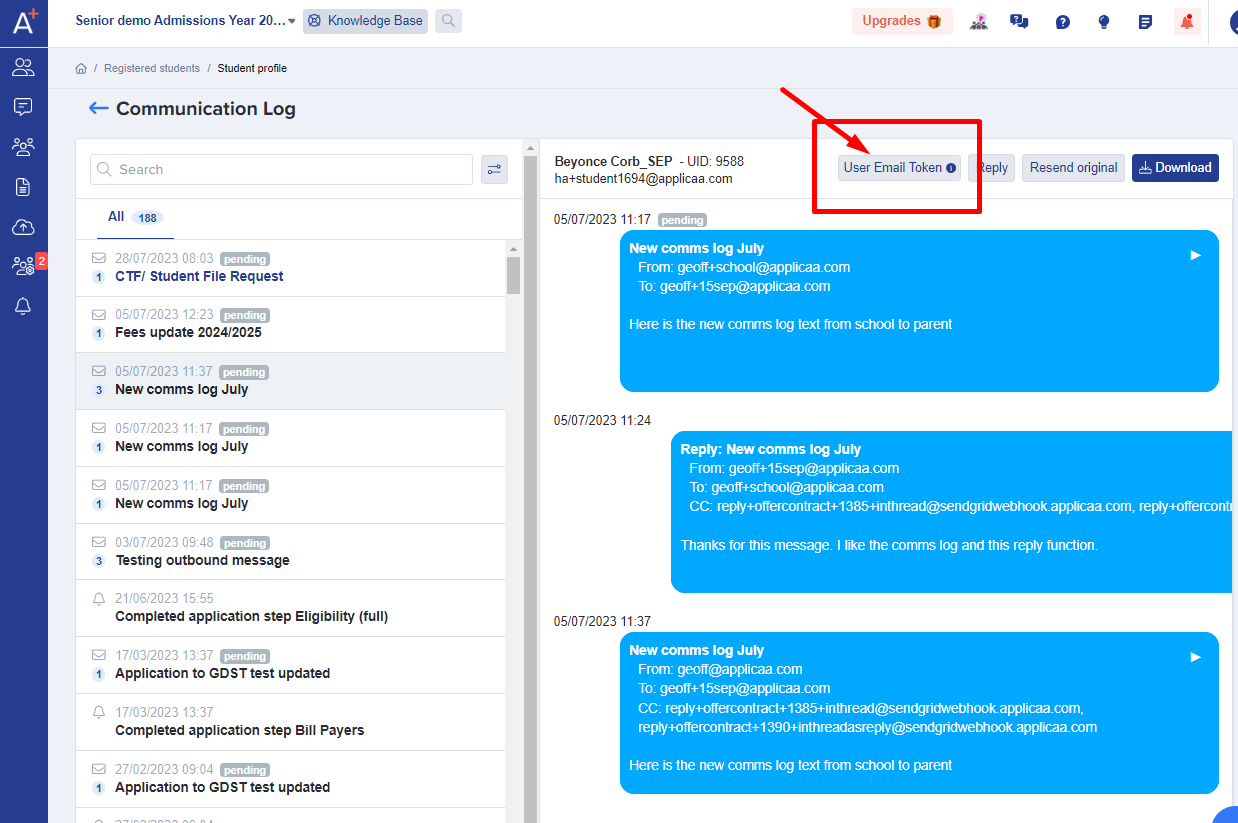
User email token:
An additional useful feature for schools is the 'User email token', which can be found on the right-hand side of any opened message. This token allows schools to effectively utilize it for various purposes, such as forwarding messages or replying with CC. By using the token appropriately, schools can streamline their communication processes and maintain organized records in the communications log.
Note: User email token is specific to the contact.
Another useful token is the system token obtained by going into your settings > school settings > general settings > from there you'll see the 'School Email Parsing Token' - what you'll then have to do is to click 'copy token' and put it into your To or CC field. The system will then work out whose communication log to place the email in. This is useful for forwarding emails to communication log or replying to parents and copying the reply to communications log.

Note: That this is a system token for any contact. The system will find the contact in the email and allocate it to their Communications Log.
You can apply this token in various scenarios, such as:
-
-
Forwarding Messages: If you've received an email from a parent and need to forward it to your inbox, insert the token into the message. The original email's subject and content will remain intact. The system will automatically associate it with the respective parent in the communications log.
-
Replying with CC: If a parent emails you directly, and you want to reply while copying the message into the communications log, use the CC address. This ensures that both the parent and the communications log receive the response.
-
By following these steps and using the token appropriately, you can streamline your communication processes and maintain organised records in the communications log.
Sending Bulk Emails:
This update includes an additional verification layer to check recipients before sending emails. This feature proves handy, especially when dealing with bulk email sending.
Lastly, Setting Up System token Failure Notification Mailbox:
To set up the mailbox to receive delivery failure notifications, go to Settings > School Settings > General Settings > under Basic School Information there is a ‘Bounce back emails to’ field.

Ensure that the Edit button for the page is selected so that you can enter the mailbox that will receive the notifications of any bounce backs (where a student / parent account cannot be found)


Should you have any further concerns/questions, please contact your designated Customer Success Manager if you're still in your first cycle, otherwise contact our support line via this number 0203 667 0764 and they'll be glad to assist you.