This guide will help you restrict your enquiries from creating applications until you approve them and notify them.
In this guide we will be looking at two separate ways to restrict your applications.
- Enruiries Form - Entire year groups regardless of year of entry
- General Settings - Specific year groups by year of entry
Editing your enquiry form
To change the settings on your enquiry form, On your dashboard, Go to Settings and select Application Form.
On the Account Creation phase, Go to step 1: Enquiry by either clicking on the word itself or the cog button on the right.
In this step, go to the “other settings” section by selecting it from the left-hand side menu or by scrolling down.
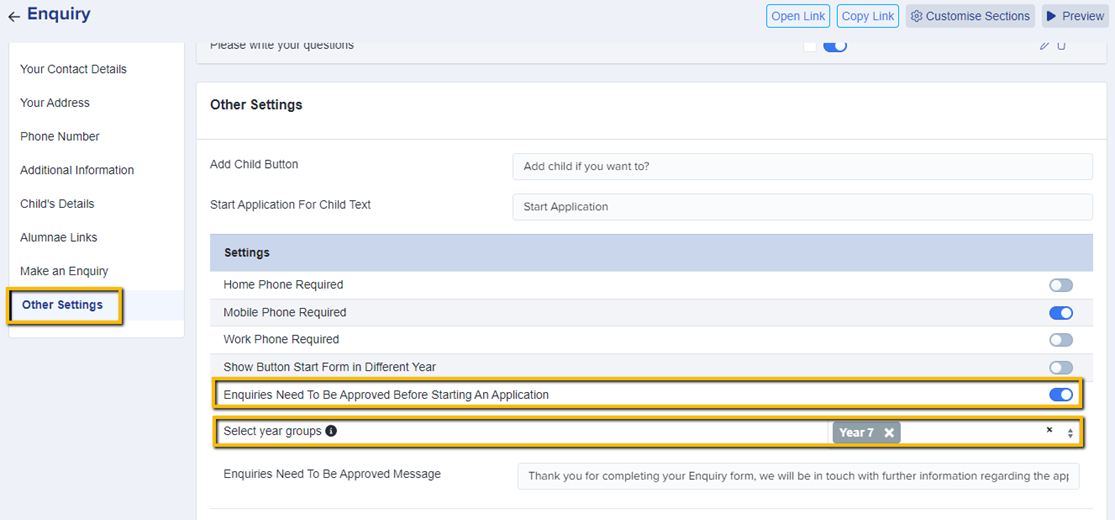
- This setting can be toggled on or off.
- When using this setting, Select the year groups for which you want to approve enquiries. Any omitted year groups will not require approval.
- Turning the setting off will allow your enquiries to start their application immediately upon logging in.
- By turning this setting on, once the parents create an account, an enquiry will be submitted. When they log into their profile, the option to start an application for the student will be locked until you approve them to proceed.
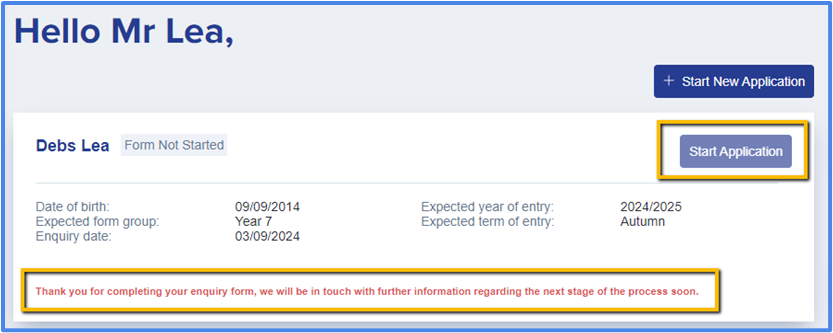
Changing the Enquiry status
There are different ways to change the enquiry status of your applicants.
The First option is from the parent profile, scrolling down and looking for the enquiry created on the right-hand side. From there you can change the enquiry status to “pending” or “approved” 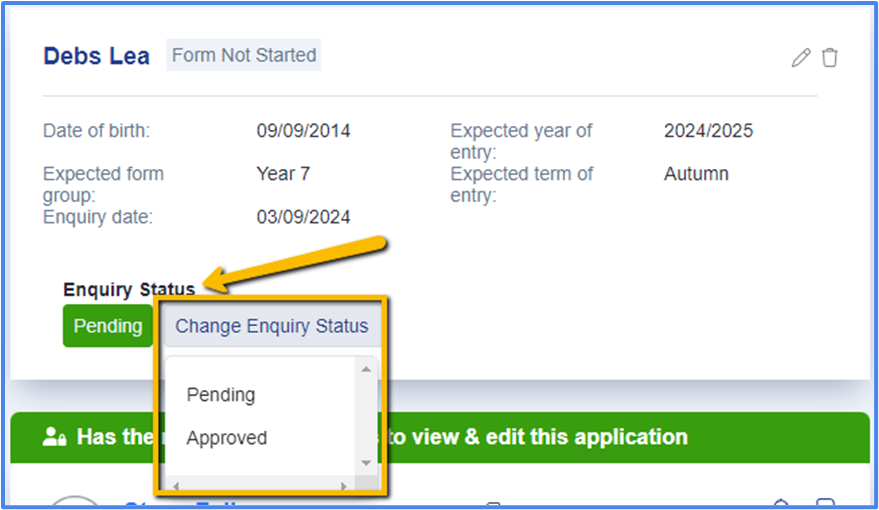
Another way to change the enquiry status is from the Enquiries table.
Navigate to the Parents & Enquiries on the left-hand side menu bar and select enquiries, this will bring you to the enquiries table.

In this table, You can change the enquiry status individually or in bulk.
Select the enquiry by ticking on the checkbox, once selected, The action buttons will then be displayed on top. Click on Change enquiry status and set it to “pending” or “approved”.
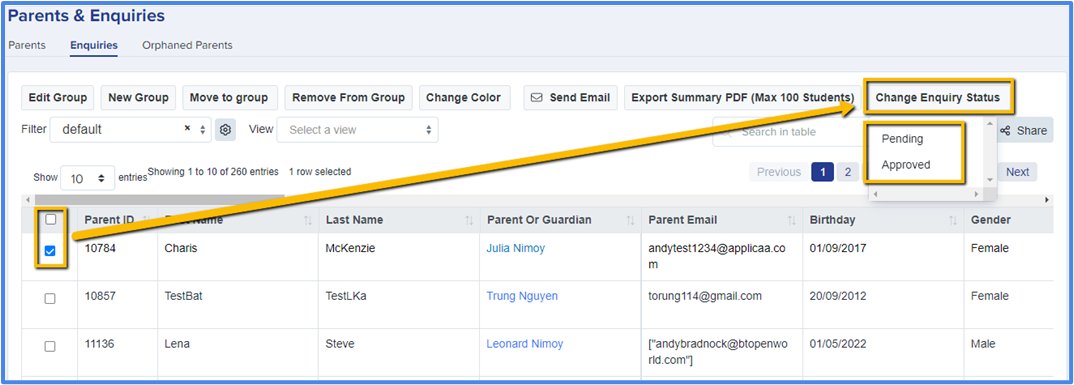
Once you have updated the enquiry status and approved them, only then the parent will be able to start their application.
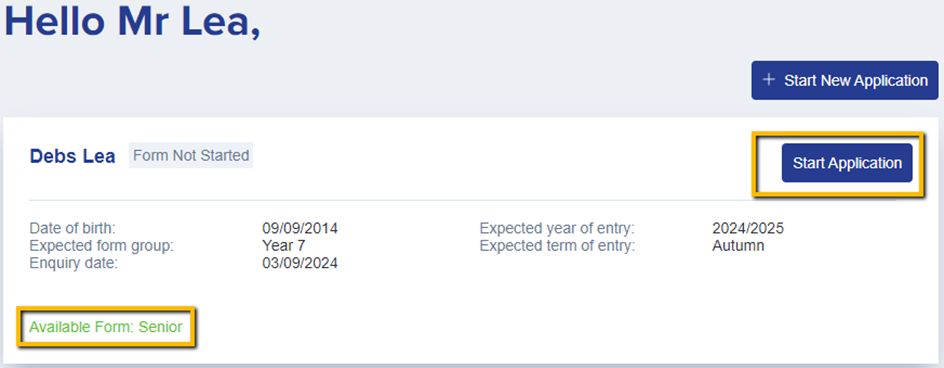
You will need to notify the parents that they can now start an application form, by either calling them to advise or emailing them.
General Settings - Student Year Group Mapping
Using the year group mapping means you are restricting the applicants from starting an application based on the year group. To enable this setting, Navigate to settings, Select school settings and click on General settings

The year group which are ticked will be able to start an application to the corresponding year of entry. The unticked year groups will not be able to start an application form.
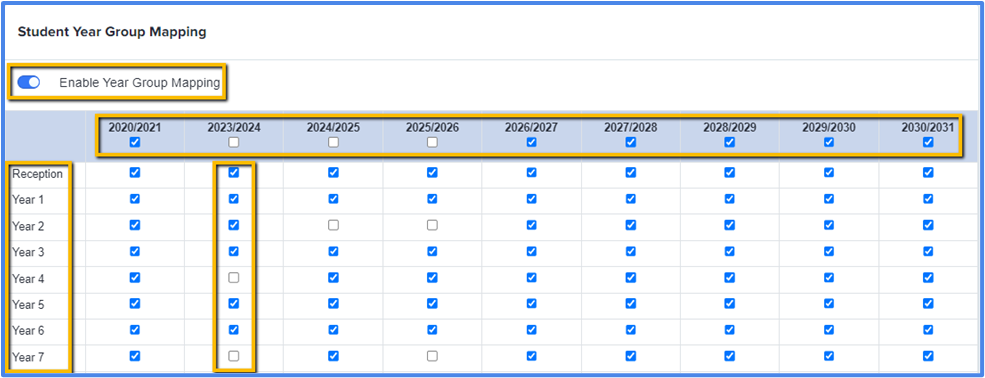
Configuring the General settings - Student Year Group Entry Lookup
You can also restrict enquiries by using the setting DoB forces Expected year group on entry. By having these settings on, When parents are completing the enquiry form, it will force the student to a year group depending on the combination of their date of birth and the expected year of entry.
To enable this setting, Navigate to settings, Select school settings and click on General settings

In General settings, go to the section Student year group Entry lookup. Here, You can enable the setting Force year group and Show year group DOB table.

To create a new year group DOB lookup table, click on the “+ new year group DOB lookup” button found on the top right of the table. A window will pop out and require you to fill out the fields, Enter the details for Date from and Date to, expected year of entry and Target year group then click on "Save"

In editing the table, ensure that you are entering the correct details into the corresponding field.
Date from and Date to - range of the year for the date of birth
Year group on entry - expected year group on entry for the following years
Year of entry - the expected school year on entry
To make changes in the table, Just click on the empty spaces that have a broken underline. For the setting Date from and Date to, you can set the range for forcing the year group by adjusting the date of birth. Following that, select the year group and input to the corresponding year of entry.

Once you have these settings set up, when a parent is filling out the enquiry form and selects the year of entry & sets the date of birth, it will force the student to a year group based on the lookup table you have set:

By clicking on the calendar on the date of birth field, It will display the projected entry points. Here you can see the year of entry and expected year group based on the date of birth of the student:

