Distance Calculations
We’re pleased to say that due to many requests, Admissions+ is now able to display the distance between an applicant’s home and your school. We know that for schools that use distance as an admission criteria, this is very useful to have, but it also is important that it’s calculation is very transparent and accurate. For this reason, we are offering your school two different ways of dealing with distance – you can either use official distance figures that you may have been provided with by your local authority, or have calculated yourselves, or you can let Admissions+ calculate distance for you (which we will explain later in this article.)
Enabling Distance Options
If you wish to display the distance between a student’s home and your school, go to “Settings”, “School Settings” , "General Settings" and scroll to the bottom. You will then be asked if you want to enable the display of distances, and what method you would prefer to use for obtaining them.
Option One: Letting Admissions+ calculate the distances
If you would like us to calculate the distances for you, then select this option in the ‘settings’ menu. Here’s the information you will want to know about how this works:
You’ll first need to enter the latitude and longitude that your school uses for official distance calculations. This might be the exact position of your school gates, or the middle of your building, etc., depending on your admissions criteria.
There are different ways that latitude and longitude can be written, but our software wants you to enter this in a ‘decimal’ format – an example of which would be Downing Street, whose coordinates are: 51.503223, -0.127500. Addresses in the western hemisphere have a ‘negative’ longitude using this system.
The system then looks up the latitude and longitude of a student’s home address using the official coordinates provided by the Royal Mail’s address database. This is specific to each individual house/flat, and this function will only work if the student has selected a valid address when entering their address in our system. If they have not chosen a valid address from the list of addresses when filling out their application, the system will not be able to determine the location of their home.
There are different formulae that can be used when calculating distances, and our code uses what’s called a Haversine calculation, which produces an ‘as-the-crow-flies’ calculation which takes into account the curvature of the earth when calculating distances. This doesn’t make a noticeable difference for very short distances like the distances around a school catchment area, but does result in a much more accurate calculation when the distance starts to be larger – for example when a student is coming from the next county, etc.
https://www.movable-type.co.uk/scripts/latlong.html
Note: To calculate distance we use Ideal Postcodes and then the address the student has chosen.
Ideal Postcodes create a measurement for an address by using 2 geocodes per address (alongside the longitude and latitude):
x1 Royal Mail central point geocode (for the location)
x1 roof top geocode (to provide the point within the location)
Distance will be auto calculated if the Applicant selects their Address from the dropdown list after inputting their Postcode. This will also auto populate the rest of the address fields.
Option Two: Importing distances from a file:
If you choose the option of providing them yourself, after saving this screen, you will need to go to the imports area of Admissions+ by clicking on the ‘Data” icon on the left-hand blue bar (the one that looks like a cloud), and then choosing the ‘imports’ option, and then clicking on the ‘start an import’ button at the top-right of the screen.
Give your import a name – perhaps, “distance figures” for example, then click on the ‘users’ radio button, and then click on the blue button at the bottom-right. On the following screen, choose ‘existing users’ and then click again on the ‘next’ button. On the next screen, choose ‘students’ an click on ‘next’. Choose the ‘CSV’ option and then click on ‘next’.
On the next screen, you can either ‘drag and drop’ the CSV file that contains your distances, or you can click on the ‘browse files’ option to find and select the file on your PC.
You will then be taken to a ‘mapping’ screen, where you will need to identify the column that contains your student ID’s, and the distances. Map them to the correct Admissions+ property, which in the example below is the ‘Bromcom Student ID’ and the ‘Distance’.

Where to see the distances:
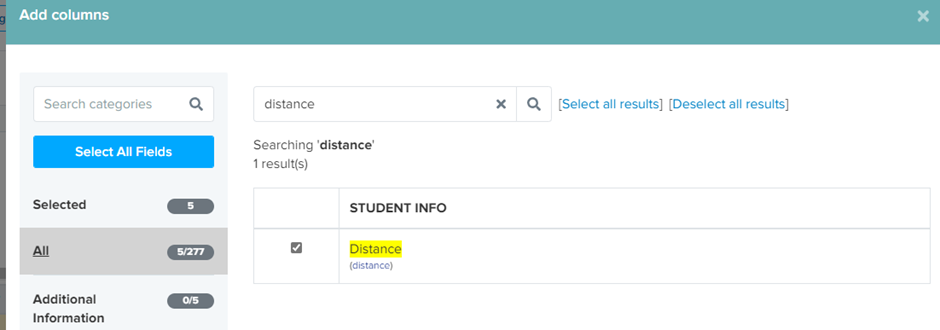
Once you’ve enabled the distance function, you can see the distances in two places – in an individual student’s record in the address section, and also by adding the ‘distance’ column to a student view. To do this, pull up any list of students, and then click on the ‘view’ dropdown. You can then ‘add’ a new view and when there, you can ‘add’ the property called ‘distance’ (see example below):
Troubleshooting: what if the distance is not being calculated for some applicants?
If an applicant manually inputs their address rather than using the dropdown menu when searching by postcode, their distance will not be calculated. Here are some things you can do:
- Add a description/instructions on the "address" section of the student's basic details step of the application form to inform applicants to choose their address via the postcode lookup feature.


- Move the postcode field to the top of the address section, on its own line so it stands out


- Impersonate any applicants where distance has not been calculated, and re-input their address using the postcode lookup field and then "save and next" - this will generate their distance for any which are missing

Calculating Latitude & Longitude
This conversion tool is freely available and easy to use; input your coordinates and it will convert them for you so you can use them in our Distance Calculator.
For example, if your original coordinates were:
Easting (X) 492983
Northing (Y) 188837
Then your decimal equivalents would be:
Longitude -0.659174
Latitude: 51.590722
Note: Addresses in the western hemisphere will always have a negative longitude using this system.