New Application Form View
This guide will walk you through how you can configure Step View & Phase settings within the new view
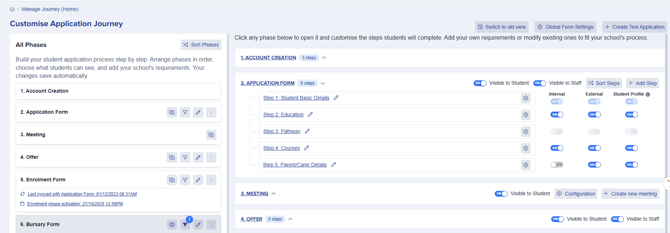
The main improvement in the New View over the Old View is that you can now access and adjust all configuration options for both steps and phases on a single page. This streamlined layout gives admissions teams a comprehensive overview of the form structure, making it easier to navigate, update, and manage every aspect of the application process without having to switch between multiple screens or menus. By consolidating all settings in one place, the New View enhances visibility, speeds up configuration, and supports a more intuitive workflow, reducing the time needed to tailor your application journey to your school’s unique requirements.

Phase Configuration
To rearrange your phases, click the "Sort Phase" button to open a drag-and-drop interface. This allows you to quickly adjust the phase order to reflect your admissions journey, from Applications through Meetings and Offers, and finally to Admissions or Enrolment, ensuring the process aligns with your school's requirements.

Phase Control Buttons
Each phase includes dedicated action buttons for managing visibility, setting applicant filters, editing details, and configuring settings like submission locks or form availability.

- Eyeball - lets you control phase visibility, determining whether applicants are able to view or access the steps and questions included within that phase
- Filter - lets you set filters to control which applicants can access each phase. For example, you can restrict phases to internal or external applicants, specific year groups, or applicants who meet custom criteria. This ensures every applicant only sees phases relevant to their circumstances.
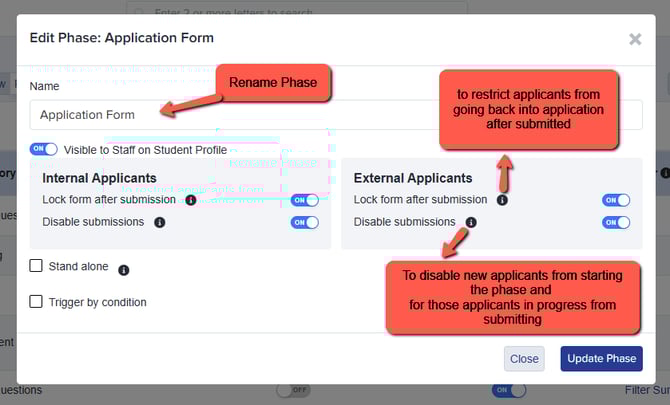
- Pencil - enables you to rename and adjust phase settings, such as locking a form after submission to prevent further edits, or disabling submissions once the phase deadline has passed.

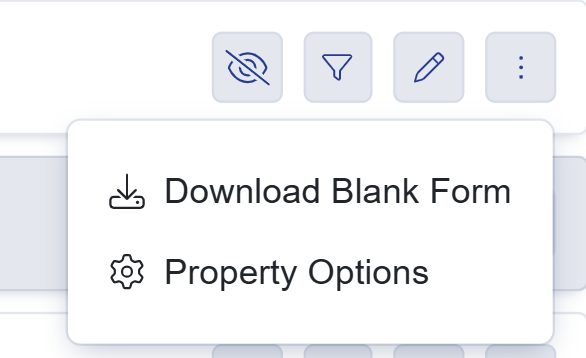
- Kebab/Three-dot Menu - clicking on this button will show you a dropdown for Downloading the blank form and opening the Property Options
Step Configuration
In the New View, you can easily add, rename, reorder, and configure steps within a phase using the panel on the right. Enable or disable steps, set access permissions between internal and external students, and customise each step to fit your application or admissions process.

You can add your own steps as needed, via the + New Step button.  You can quickly reorder steps in your form to suit your workflow. Click the "Sort Steps" button to open a drag-and-drop interface, allowing you to adjust the sequence so the journey is logical for applicants and aligns with your admissions process. This lets you tailor the application experience, grouping key information or related sections as needed.
Toggle switches allow you to easily control visibility by turning options on or off, managing access and visibility as needed.

The steps can be renamed by clicking on the pencil button.
To view the questions within a step, simply click on the step’s name or select the settings cog icon