You may access your application form by following these steps:
Click on Settings > Application Form

Application Form Structure
The application form is divided into phases, steps, sections, and questions.
-
You can read more about Phase View [here].
Step Settings
Each step includes toggle buttons that allow you to decide whether certain questions appear in the form.
- Blue means the step is active, while grey means it is disabled.
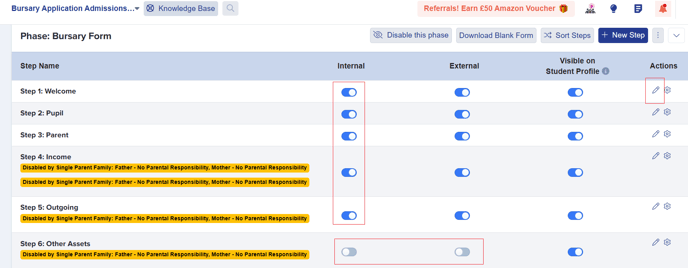
To access questions within a step, click the step name or the settings icon in the "Actions" column.

You can also add new steps using the + New Step button.

Section Settings
Customise Sections – Use this option to add a new section to an existing step. After creating a section, you can add individual questions to it and organise them accordingly.

Adding New Questions
Each section in your form has a + New Question button. You can:
-
Add extra questions to an existing section.
-
Create a new section from scratch.

- Choose what you kind of questions you want to add—whether it's a field that writes back to your MIS, a custom one or a simple text block for providing information.

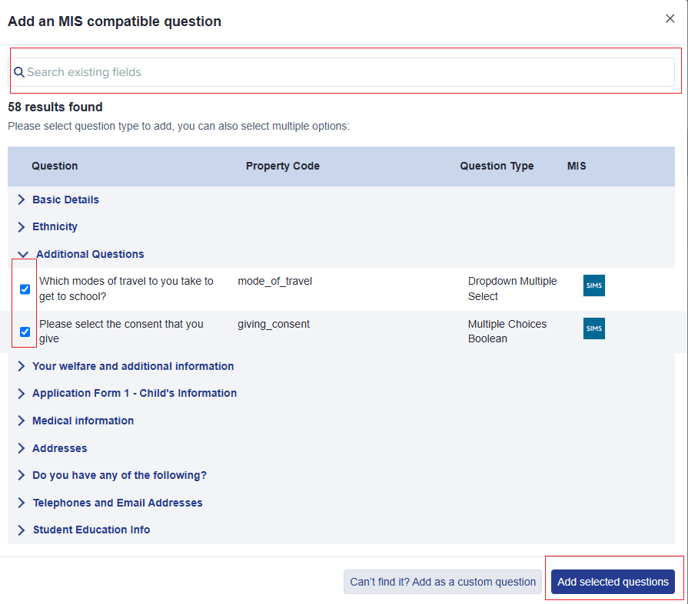
If an MIS-compatible field doesn’t exist, you can switch to adding a Custom Question instead.
Note: Custom questions do not write back to your MIS.
If you choose to add a Custom Question, you'll be reminded that it won't write back to your MIS. You can search to check if the question already exists or select a question type to create and add a new one. If you decide to switch to an MIS-compatible question instead, a button is available to take you to that screen.

Question Types
-
Text Input – For free-text responses.
-
Single-line text: Short answers.
-
Multiple-line text: Paragraph responses.
-
Phone number & signature fields available.
-
-
Selectable Options – For multiple-choice questions.
-
Single Select/Dropdown Single Select – One choice allowed.
-
Multiple Select/Dropdown Multiple Select – More than one choice allowed.
-
Date Picker and Yes/No options available.
-
-
Unit Value – Use this for numerical fields (e.g., income, benefit amount).
- File Upload – Use this to request documents (e.g., Proof of Address, Birth Certificate).
You may also choose to add a Text Block if you wish to provide instructions or descriptions, or if you need to explain more details to applicants.
Once you have selected your question type, you can format your question. You will be asked to select the property group and should choose the one that most closely matches where your question belongs.
Next, type your question in the Title box and set any applicable parameters before clicking Add Question.

Arranging Questions
-
Click Sort Questions to drag and rearrange them.

-
Choose display width:
-
33% = 3 questions per row.
-
50% = 2 questions per row.
-
100% = 1 question per row.

-
-
Questions are arranged left to right.
Individual questions can also be turned on or off using the toggle switches. We strongly recommend switching off questions you don’t need rather than deleting them. The MIS logo next to a question means that the property is transferable to your MIS when you export applications at the end of your admissions cycle.
Managing Question Visibility
-
Toggle individual questions on or off to manage whether they appear on your form instead of deleting them (recommended).

-
A blue checkbox indicates that a question is compulsory, meaning parents or students will not be able to proceed with the form unless they answer it.

-
Required questions have a red asterisk (*).

-
Visible on Student Profile – Enables admin view of the answer.

You can also control visibility:
-
Internals – Students already in your MIS.
-
Externals – New applicants.

Toggleable/Conditional Questions
You can set a follow-up question to appear based on a previous answer.
For example:
-
If a parent selects "Yes" to a question about working, a follow-up question appears asking about income.


Learn more about Toggleable/Conditional Questions [here].
Previewing Your Application Form
After making changes, preview the form by clicking Preview Application Form.

-
The preview options depend on your intake settings (Internal/External students).
