First navigate to Communications and Events > Events and select the Events Calendar Tab.
Click on Add New Button.
Set the Event Details (Event Name, Type, Start & End Date, Start & End Time, and required Description. Location is optional and you may add an image of an event if you wish.

TICKETS provide you with the ability to create an event and schedule multiple engaging sessions within it.
NUMBER OF ATTENDEES - refers to the maximum count of students or parents who can attend the event.
SHOULD USERS BE ABLE TO REGISTER THEMSELVES – tick this box to allow users to register themselves using the public URL of the event. Leave it unticked if the event just needs to be visible on the calendar and does not require anyone to book to attend.
EVENT HAS MULTIPLE TICKETS – ticking this box will allow you to create multiple sessions or options within the event
TICKETS HAVE THEIR OWN DATE & TIME – this tick box will allow you to create tickets with various dates and times within the range specified in the main event.
Visibility settings allow you to define where an event is visible and how it is presented. You can control which areas of the system will display the event and you may choose different visibility settings per event, depending on the nature of it.

Close Registration After - allows you to automatically set a cut-off time for event registrations. Once the specified date and time are reached, the system will prevent any new registrations, ensuring you have full control over attendee numbers and deadlines without needing to manually close the event.
Additionally, the Advanced Filter function allows users to define who will be able to see the event based on various criteria.

For more detailed guidance on how to use the Advanced Filter function, please refer to the full guide here.
“Emails” - lets you automate confirmation messages for event registrants directly from the event form. Each email is based on an editable template with tokens for event details, QR codes, and “Add to Calendar” links, making it easy to customise and ensure attendees receive accurate information.

For more detailed guidance on how to set-up and customise email, please refer to the full guide here.
Questions feature lets you customise the registration process by choosing which questions to ask new registrants or those with existing Applicaa profiles. With Data Collection, you can decide whether to gather details from all attendees or only from the primary registrant.
Notify Staff of New Event Registrations
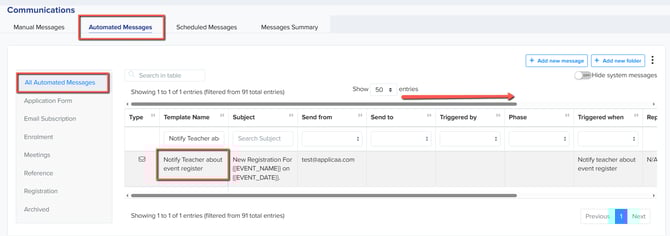
The “Notify Teacher about event register” automated message allows staff members to receive an email whenever a new registration is submitted for an event.
By default, this notification is inactive, but you can enable it by going to:
Communications and Events > Communications > Automated Messages and searching for “Notify Teacher about event register”.
** if the template is not in full-screen view, use the scroll bar to move across and access all settings.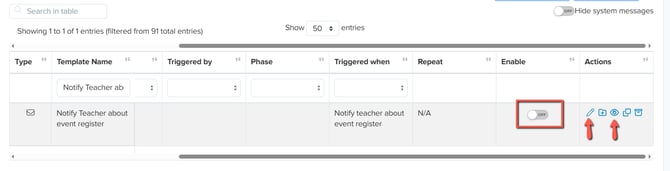
- Pencil Icon– Edit the template content.
- Eye Icon – Preview the email content.
- Toggle Switch – Enable or disable the template.
Waitlist Activation is turned off by default when creating a new event, but you can enable it to allow registrants to continue to register after an event is full, and be added to your waitlist for manual or automated management.

For more detailed guidance on how to use the Event Waitlist, please refer to the full guide here.
You can choose to Save & Publish or simply Save each event. The latter will save the event as an unpublished draft, which you can then publish when ready.

Once the Event has been created there will be 2 URLs that will be generated that you can use to share to parents or post on your school website or social media.
Public URL - use this link if you only want people to register for the event
Enquiry URL - use this link if you want parents to register for the event and at the same time submit an enquiry (create an account)
